|

Due to the various versions of Microsoft XP, and the variety of add-on packages, these instructions could vary slightly from your PC. When following along with our instructions, you may encounter additional options or varients. By reading ahead in our instructions, and following the Microsoft suggestions, you should find these varients easy to overcome. If you have any questions or need of assistance, please contact our Sales or Tech Support staff at the number at the bottom of this page.
REQUIREMENTS
- TCSN Dial-Up Account
- A printout of our support page
- Windows XP installed (And possibly the CD on-hand)
Control Panel & Dial-Up Access
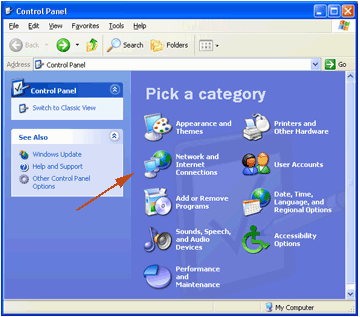
Dial-Up Internet Access is configured using the Control Panel. To open the Control Panel, click 'Start' then 'Control Panel'. If you are using the Classic Menu system, you will find 'Control Panel' listed under 'Settings'.
Once the Control Panel is open like shown above, choose Network and Internet Connections.
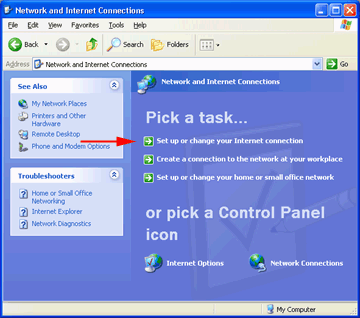
In this menu, you want to choose Set up or change your Internet connection as shown above. This will launch the Internet Properties Window.
B: Creating A New Connection
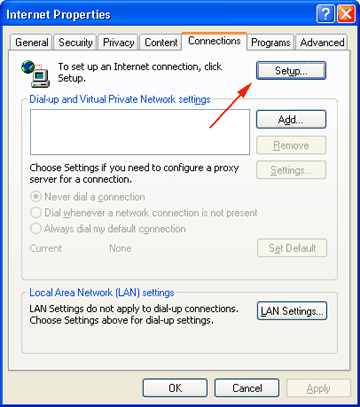
If you have already established a Dial-Up connection on this PC before, you will see it listed in the Dial-up and Virtual Private Network settings white box.
- If you have connections in the box, but they are old/uneeded, select them by clicking on them once, and hit the 'delete' button.
- If you have nothing in the white box, choose the 'Setup' button to start the Wizard.
C: New Connection Wizard
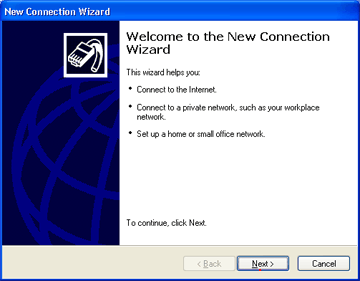
Once the Wizard starts, choose 'Next'...
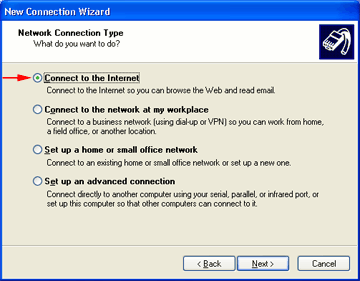
Since we will be creating a Dial-Up account to connect to the Internet, select Connect to the Internet and then hit 'Next'.
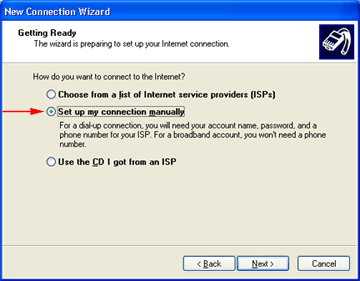
Our ISP does not require an additional CDROM of software, or any other form of advertisements. All required software is already contained in your Operating System. Because of this, simply choose Set up my connection manually then hit 'Next'.
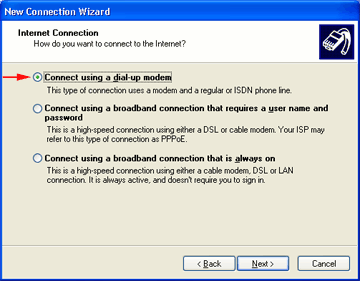
In this next window, select Connect using a dial-up modem as shown above, then hit 'Next'.
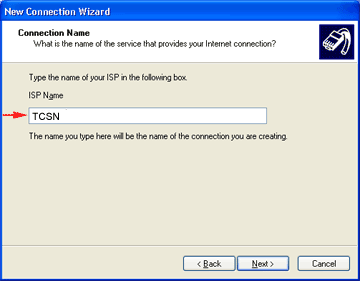
We now need to give this connection a name. This name will means nothing technically other than our ability to recognize what this particular connection is for. Because we are configuring Dial-Up access to
TCSN, insert TCSN in the blank as shown above. Once completed, hit 'Next'..
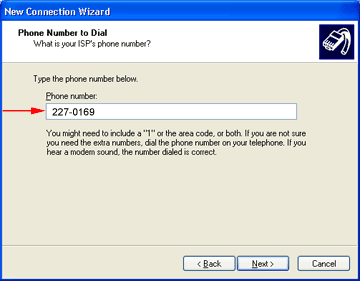
This window requires the telephone number for Dial-Up access. To obtain this number, please look at the list of available numbers for your Dial-Up access Number.
- Choose a number that is local to you, make sure you are not having to dial long distance where necessary.
- If you need to use special a dial prefix, you can also enter that information here.
- To disable call waiting, put the following prefix before the phone number : *70,, (*70 is used by Pacific Bell. Your number may vary, consult your phone book for instructions.)
Example : *70,,477-1000
Once the phone number is entered, hit 'Next'.
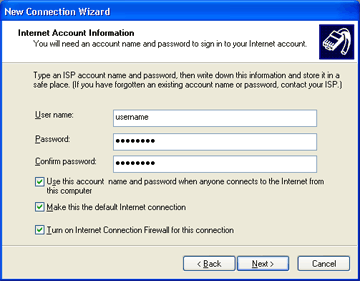
This next window is where you will place your username and password which will allow you Internet access. Normally, your username is
lowercase lettering with no spaces. If your dialing in from outside of
California use TCSN/ ahead of your user name.
Insert both your username (all lowercase) and password (also all lowercase) in the blanks as shown above. You can also review the 3 options listed, but we recommend you leave them at default (selected).
Once the information is entered, hit 'Next'.
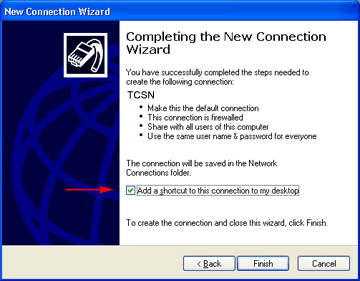
We have completed all the information required. To make it easier to connect to the Internet, we will place a shortcut on the desktop (wallpaper) for easy access. Make sure Add a shortcut to this connection to my desktop is selected as shown, and select 'Finish'.
D: Connecting to TCSN
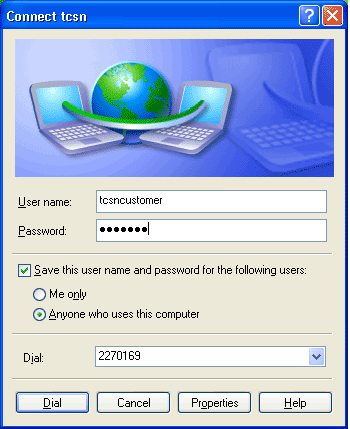
Double-Click the icon we placed on the desktop, to bring up the connection screen (pictured
above).
The information we have already entered will be displayed, and you should be ready to simply hit 'Dial'.
Windows XP has the capability for multiple users to log into a machine and have a variety of profiles. For this reason, you will find the selection Save this username and password for the following users selection. This is considered Advanced Options and can be left at default.

Once you have successfully connected to the internet, you will see the connection in your system tray as shown above.
You have successfully connected to the Internet & TCSN, and are now free to use your Internet Applications such as Internet Explorer, Netscape, OutLook Express, etc.
If you have any questions or are in need of additional support, please contact
our Technical Support staff at 800-974-3475 or 805-227-7000 extension 1 |